Add a Site Visit
Add a Site Visit
Perform the following step to create a new site visit from Info Exchange.
To view and create a new site visit, you must be a member of a Permission Set that allows the creation of new site visits.
To add a site visit
If you are not already there, open the Site Visits log from the View > Field Management menu.
Select Add Site Visit to open the Add Site Visit dialog box, shown below:
The Created By, Visit ID, and Start and End date fields populate automatically but you may overwrite the values.
Enter a name for the visit in the Visit Name field.
Select Created by to open the Select Project Team Members as Recipients dialog box. Select the site visit creator. The current user is selected by default.
Select Template Name to assign a different template if needed.
Select the site visit Type.
In the Walkthrough section, select the Start and End time of the site visit, as well as the Participants of the visit.
If you want to distribute the site visit, select the To and/or CC fields to open the Select Project Team Members as Recipients dialog box.
Select Keywords to add further detail to the site visit.
Add any site observations in the Observations tab. For more information on adding observations, see To manually add an observation, To add an action item from the observation Tasks, and To add observations from a field note below.
Enter the purpose of the site visit, any general project observations, any weather-related comments, and any internal notes in the General tab.
Select Save and Close to save the site visit.
Create Next in Series – Once you create the site visit, you can create a new site visit item as a continuation. Select Create Next in Series to generate a new site visit, using information form the existing site visit, including: the Visit Name, Template Name, and Observation details.
To manually add an observation
Select Add on the Observations tab to create an observation record, shown here:
Mark the Urgent checkbox if needed for this observation item.
Select a Category.
Select the Space associated with the observation.
Enter a Subject.
Enter any comments pertaining to site conditions in the Remarks field.
Enter anything you want to cross-reference in the Reference field.
Click the  button to open the Discussion Items dialog box to enter and edit any discussion items.
The Date Created field automatically inserts the current date, but you may edit it if needed.
The Author field automatically inserts the current user, though you may select another contact.
Select the Closed checkbox to close the observation item, then select the close date in the Date Closed field.
Select Tasks if you wish to take further action on the site visit observation.
To add an action item from the observation Tasks
Click Add on the Observations tab then Add Action Item in the Tasks list.
Select an action item Type.
Enter a Subject. Select to open a larger dialog box so that you can see the full description.
Select the importance of the action item in the Priority field.
Select Assigned To to open the Select Project Team Members as Recipients dialog box. Select the contact responsible for fulfilling the action item.
Select CC to open the Select Project Team Members as Recipients dialog box to add other contacts.
Select Due Date to set the date by which the action should be completed.
To set a reminder on the action item, mark the Remind checkbox and set the number of days prior to the due date to send the reminder in the Remind Days drop-down list.
Select Status to set the relative status for the action item.
The action item is created when you save the site visit.
Once saved, you can further edit the action item in the Action Items log.
To add observations from a field note
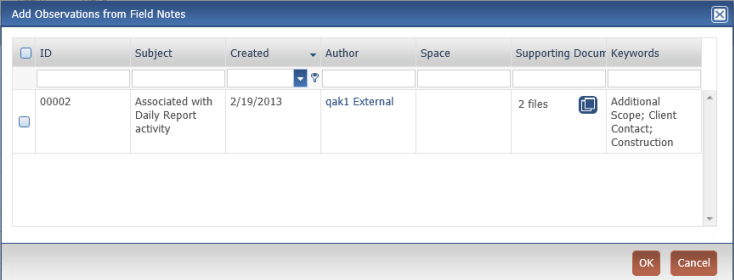
Select Add From Field Note to open the Add Observations From Field Notes dialog box, shown here:
Use the filters to locate the desired field note. Once you find the field note, mark the checkbox and select OK.
