Create a Form Letter
Create a Form Letter
Perform the following steps to create a form letter using the Newforma Contact Directory. Users can then use the template form to generate a form letter for a contact or multiple contacts. Form letters can be generated from a template designed in Microsoft Word. The template contains the body of the form letter, and any variable fields would be represented by Mail Merge fields.
You must be a Global or Content administrator to create form letters.
To create a form letter
If you are not already there, open the Newforma Contact Directory (shown below) by clicking the  icon from the Project Center Toolbar.
Click the Form Letters tab.
Click Add Form Letter from the Tasks panel to open the Add Form Letter dialog box, as shown here:
Enter a name for the form in the Form Name field and instructions on using the form in the Instructions field.
Click Form Type to open the Choose Form Type dialog box to apply keyword types to the form.
Form types are keywords defined in the Project Center Administration Activity Center Keywords tab. A Content Administrator can define keywords from this utility.

Select the appropriate choices from the Applies to drop-down lists:
From the first field:
Select The Form Applies to a Single Contact. Multiple Forms or Letters May be Generated at Once to generate a new form for each contact.
Select The Form Applies to or Will be Sent to Multiple Contacts. A Single Form will be Generated to generate a single form that is sent to all contacts.
From the second field:
Select The Form Does Not Include Information from a Project to prevent users from adding project information to the form letter when they generate it.
Select The Form Includes Information from a Single Project to allow users to add information from one project to the form letter when they generate it.
Select The Form Includes Information from a List of Projects to allow users to add information from multiple projects to the form letter when they generate it.
Click the Settings tab and fill in the necessary parameters. Refer to the Add Form Letter dialog box for information about each field.
Click the Additional Fields tab to create additional fields to add to the form. Use this tab to add additional customized fields to the form so that form users can send fully populated forms to recipients in a single step. For more information on additional fields, see the example below.
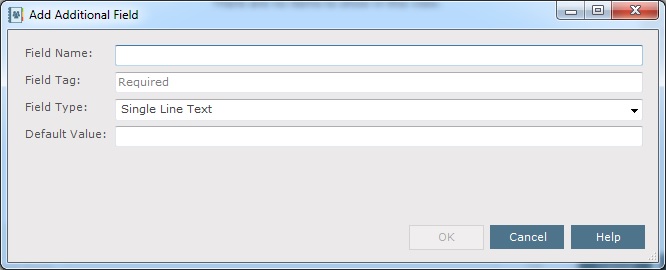
Click Add to open the Add Additional Field dialog box, as shown here:
Enter a name for the new field in the Field Name field. This is the field name that appears in the Generate Form Letter dialog box. It is for reference only and does not appear in the actual form letter.
Enter the field tag in the Field Tag field. The field tag is the attribute name that corresponds to the mail merge field in the form letter. It references the merge field in a Microsoft Word document. It must match the mail merge field name in the form letter (It is not case sensitive.). For example, if the mail merge field name is Company, you must enter Company (or company) in this field.
In order for the additional field to be used, it has to be referenced with a merge field in the form letter. In the final document, the merge field is replaced with the value that the user enters. If the merge field does not have a value, it is left blank.
Select the Field Type from the drop-down list. The following field types are supported:
Single line text – this will prompt the user for a single line of text.
Multi-line text – this will prompt the user for multiple lines of text.
Single project item – this will prompt the user for a single project item.
Multiple project items – this will prompt the user for multiple project items
Single contact – this will prompt the user for a single contact.
Multiple contacts – this will prompt the user for multiple contacts.
Keyword – this will prompt the user to select one or more keywords.
Yes/No – this will prompt the user to select either Yes or No.
Date – this will prompt the user to select a date.
Any additional fields added will be presented to users when they click the Edit Form Letter task.
If you want a default value to appear in the field you are creating here, enter the value in the Default Value field. The value will be output to the form letter unless another value is entered.
Click OK to add the additional field.
Click Test Form to open the Test Form Letter dialog box to go through the steps to test the form letter.
Click OK to save the form letter definition. It will appear in the Form Letters tab.
Additional field example
An additional field is created to prompt for the details about a safety issue that was witnessed on a construction site, as shown here:

The Field Name is used to reference the field. When you generate the form (using the Generate Form Letter task), you will be prompted for the Safety Issue Description:
You must select at least one contact to preview the form letter.

You can then enter a value/information for the field:

In order for the additional field to be used, it has to be referenced with a merge field in the Microsoft Word template (.DOCX file), as shown here:

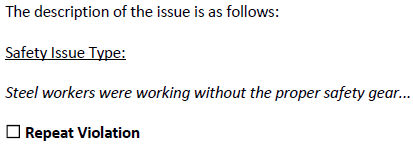
Additional fields are contained in the “root” node of the XML document – this is why you see root:issueDesc in the merge field. In the final document, the merge field is replaced with the value that you entered:

