Newforma Project Center Outlook Add-In Installation
Newforma Project Center Outlook Add-In Installation
The Newforma Outlook Add-in integrates Microsoft Outlook with the Newforma web app for seamless filing between Outlook items and your projects. It enables you to file email items to a Newforma web app project.
In order to utilize the Newforma Outlook Add-in, The following is required:
Requirements
Newforma Project Center 12.3 or higher
Newforma Link 1.2.12 or higher
Newforma Entra App Framework (Formerly known as Azure App Framework)
Microsoft Entra ID (Formerly known as Azure Active Directory)
- The user needs to log into outlook mail and the outlook add-in using the same login information. If there is any difference, then the user will either not be able to log into the add-in or they will login, but have issues when using the add-in. The add-in does not currently support multiple domains (or aliases).
- The user’s UPN (User Principle Name identified in Active Directory) and email address must match.
- The user must have a Project Center License for the Newforma Addin to work
- Do not proceed until the above system requirements are reviewed and completed.
The supported platforms at this time:
Outlook for 365 Windows and/or Mac
To use the desktop client, users need to sign into Office.com, then click Install Office to install the desktop client application:

Outlook Online
Outlook for iOS
Outlook for Android
Supported Exchange servers:
Exchange Online
Exchange On-Prem (2019 and 2016)
Microsoft 365 mailboxes and Microsoft 365 clients are required. You can review the hybrid deployment prerequisites here. Access and run the hybrid configuration wizard here.
Note that Exchange server support is possible, but not recommended.
The platforms are based on the Outlook JavaScript API requirement sets. The Outlook Add-In utilizes set 1.8, therefore not all features are present on other platforms.
The email reading pane must be activated on the right or bottom for the add-in to appear. Otherwise, the user must open each email in order to use/activate the add-in. This is a Microsoft add-in limitation.
Add Redirect URI
Log into Entra as a Global or Application Administrator.
Expand Applications > App Registrations.
Click the All Applications tab to view your company’s apps and locate the enterprise application. Your app likely has a name similar to the Project Center server.
To more easily identify the name of the enterprise app you created when you set this up, Newforma recommends naming your enterprise app after your Project Center server.
Do not select Newforma Cloud. It is another Newforma app and is used for other purposes.
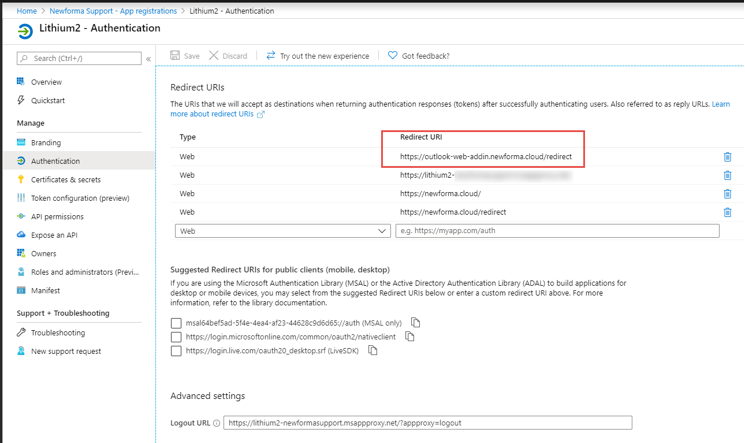
Click Authentication:

Add https://outlook-web-addin.newforma.cloud/redirect to the list of Redirect URIs, as shown in the screenshot above.
Individual Installation
Please note: The use of individual installation is only recommended when specific users are to evaluate the Newforma Outlook Add-in. Newforma recommends Centralized Deployment, since the Newforma Outlook Add-in can experience frequent updates. When there is a major update (a manifest change), Admins will be required to push the update to all users via Centralized Deployment.
Right-click the following URL and select Save link as…
https://outlook-web-addin.newforma.cloud/manifest.xml
The file manifest.xml should get downloaded to your device.
Sign into www.office.com. Once signed in, open the following URL:
https://aka.ms/olksideload
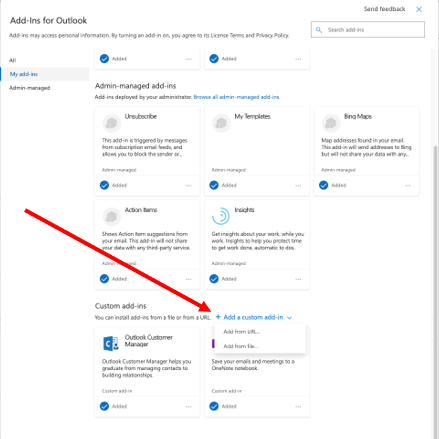
In the Add-Ins for Outlook dialog box, select My Add-ins from the left panel:

Scroll to the bottom of the My Add-Ins list to Custom Add-ins. Click +Add a custom add-in and select Add from File… from the dropdown menu:

Select the previously downloaded manifest.xml file.
Centralized Deployment
Please note: Newforma recommends Centralized Deployment, since the Newforma Outlook Add-in can experience frequent updates. When there is a major update (a manifest change), Admins will be required to push the update to all users via Centralized Deployment.
Centralized Deployment is the recommended and most feature-rich way for most customers to deploy Office add-ins to users and groups within a Microsoft 365 organization. Note that it can take up to 24 hours for an add-in to show up for all clients.
Centralized Deployment of add-ins requires that the users have Exchange Online, an active Exchange Online mailbox, and Microsoft 365 ProPlus. Centralized Deployment does not support deployments of Microsoft 365 that do not include Exchange, such as Microsoft 365 Business.
You can use the Exchange Admin Center (EAC) or Exchange Online PowerShell to manage user access to add-ins for Outlook. You can specify whether an add-in is required or optional for your users.
You can receive an email notification confirming successful deployment. It can take up to 12 hours for the add-in to appear on users’s ribbons – users may need to relaunch Office.
Microsoft 365 Admin Center
To access the Microsoft 365 Admin Center, sign into Microsoft 365 and select the Admin tile.
Within the Microsoft 365 Admin Center, select Settings > Integrated apps.
Click Upload custom apps.
From the App type dropdown, select Office Add-in.
Select the radio button to provide a link to a manifest file and input the following URL: https://outlook-web-addin.newforma.cloud/manifest.xml
Click Next to begin processing the manifest file.
Specify who has access:
Everyone
Specific Users/Groups
Just Me
Click Next and Finish Deployment to deploy the add-in.
A Deployment Status window appears. Click Next, then Close to complete the operation and close the window.
Once the add-in is installed, continue to the Add Redirect URL portion of this document as described above.
Exchange Online PowerShell
Use the following command to install the add-in:
New-App -OrganizationApp -Url https://outlook-web-addin.newforma.cloud/manifest.xml
Once the add-in is installed, continue to the Add Redirect URL portion of this document as described above.
Helpful Links
Add-ins for Outlook: https://docs.microsoft.com/en-us/exchange/clients-and-mobile-in-exchange-online/add-ins-for-outlook/add-ins-for-outlook
Determine if Centralized Deployment of add-ins works for your organization: https://docs.microsoft.com/en-us/office365/admin/manage/centralized-deployment-of-add-ins?redirectSourcePath=%252fen-us%252farticle%252fDetermine-if-Centralized-Deployment-of-add-ins-works-for-your-Office-365-organization-b4527d49-4073-4b43-8274-31b7a3166f92&view=o365-worldwide
Specify the administrator and users who can install and manage add-ins for Outlook: https://docs.microsoft.com/en-us/exchange/clients-and-mobile-in-exchange-online/add-ins-for-outlook/specify-who-can-install-and-manage-add-ins
Install or remove add-ins for Outlook for your organization: https://docs.microsoft.com/en-us/exchange/clients-and-mobile-in-exchange-online/add-ins-for-outlook/install-or-remove-outlook-add-ins
Manage user access to add-ins for Outlook: https://docs.microsoft.com/en-us/exchange/clients-and-mobile-in-exchange-online/add-ins-for-outlook/manage-user-access-to-add-ins
Exchange Admin Center in Exchange Online: https://docs.microsoft.com/en-us/exchange/exchange-admin-center
Recipients Permissions: https://docs.microsoft.com/en-us/Exchange/permissions/feature-permissions/recipient-permissions?view=exchserver-2019
On-send feature for Outlook add-ins: https://docs.microsoft.com/en-us/outlook/add-ins/outlook-on-send-addins?tabs=windows
Outlook JavaScript API requirement sets: https://docs.microsoft.com/en-us/office/dev/add-ins/reference/requirement-sets/outlook-api-requirement-sets#outlook-client-support
