Configure EDMS Server dialog box
Configure EDMS Server dialog box
Use this dialog box to configure the connection between Project Center and an EDMS Server.
After you configure the connection, you can add EDMS folders to projects using the Edit Project Settings dialog box.
Connection Name
Enter a unique name for the connection. This is the name that appears throughout Project Center when selecting files and folders. Best practice is to be brief, but use a name that users can easily identify as the EDMS system.
EDMS Server Type
Select the type of EDMS server you are connecting to from the drop-down list: Autodesk Docs, FileNet EDMS Plugin, ProjectWise EDMS Plugin, or SharePoint EDMS Plugin.
Connection Information
This section changes based on the option selected in the EDMS Server Type field above. All four options are described here.
Autodesk Docs
Client ID
The BIM 360 app ID generated during the Forge App configuration process.
Client Secret
The BIM 360 app client secret generated during the Forge App configuration process.
For details on setting up the Autodesk Construction Cloud or BIM 360 EDMS connectors, please see the following KB article on the Customer Community: How to setup the BIM 360 EDMS Connector & Autodesk Construction Cloud (newforma.com)
FileNet
URI
Contact the FileNet administrator for the URI.
Https is required for the URI field.
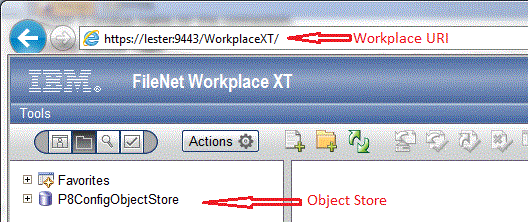
Workplace URI
Enter the Workplace URI, as shown in this example:

Object Store
Contact the FileNet administrator for the Object Store. See the example above.
Virtual Schema Path
Optional: Enter the full FileNet path to the virtual hierarchy schema file. For example: /VH/schema.json
Virtual Folders Path
Optional: Enter the full FileNet path to the virtual hierarchy values file. For example: /VH/virtualfolders.json
If you enter a value in either one of the above two fields, you must enter a value in both fields.
FileNet Version
Select the version of FileNet you are using from the drop-down list.
Buffer Size
Change this field from the default if the FileNet administrator recommends it.
ProjectWise
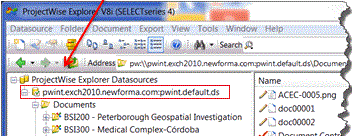
Data Source
Enter the data source string defined in ProjectWise Explorer, as shown in this example:

A ProjectWise client is required on each user’s local machine. Each users needs an account for authentication and therefore requires a client for use.
Client ID
The application ID generated during the Azure app registration process.
Client Secret
The secret value generated during the Azure app registration process.
Tenant ID
The directory ID generated during the Azure app registration process.
For details on setting up the Graph SharePoint EDMS connector, please see the following KB article on the Customer Community: Single SharePoint Online (Graph) Configuration Instructions (newforma.com)
Account Access
Use this section to define how to authenticate with the EDMS server, test the connection, and define how users will authenticate when they access EDMS data from Project Center.
Account Access does not apply to BIM 360.
Use Windows Authentication
If you choose this option, you must configure it in the EDMS and set up the Newforma Service account as an account in the EDMS. (It is disabled if it is not supported.)
Use EDMS Server Authentication
If you choose this option, you must enter the server username and password to verify the connection; users will be prompted to authenticate when they access the EDMS from Project Center.
Username/Password
Enter the username and password for your EDMS server.
Test Connection
Click to test the connection between Project Center and your EDMS.
To access this dialog box
Click Add or Modify from the EDMS section of the Project Center Administration Activity Center Global Settings tab.
